
![You are currently viewing How to set up MailerLite API key for your website in easy steps in 2024 – [Full Guide beginner friendly]](https://tribalreviews.com/wp-content/uploads/2024/08/Untitled-design-3-e1724914036267.png)
Some links may contain affiliate links, and when you buy something we recommend, we may get an affiliate commission; but it never affects your price or what we pick.
The MailerLite API key is a powerful tool that unlocks advanced features and seamless integrations for your email marketing strategy. By using the MailerLite API key, you can automate subscriber management, personalize email campaigns, and streamline data synchronization between your website and MailerLite. In this guide, we’ll explore the top reasons why integrating the MailerLite API key into your website is essential for maximizing your marketing efforts in 2024.
Table of Contents
How to Set Up MailerLite API Key for Your Website: A Step-by-Step Guide
Setting up the MailerLite API key on your website might sound complicated, but don’t worry! I’ll walk you through it step by step. Let’s get started!
Step 1: Sign Up for MailerLite
First things first, you need to have a MailerLite account. If you don’t have one yet, follow these easy steps:
- Go to MailerLite’s Website: Open your web browser and type in or click on this link www.mailerlite.com.
- Sign Up: Click on the “Sign Up” button. You’ll need to enter your email address and create a password. Make sure to remember these!
- Verify Your Email: MailerLite will send you an email to confirm your account. Just click the link in that email, and you’re all set!
Step 2: Find Your MailerLite API Key
Now that you have an account, let’s get your API key. Think of the API key like a secret code that lets your website talk to MailerLite.
Log In to MailerLite: Go back to MailerLite and log in using your email and password.
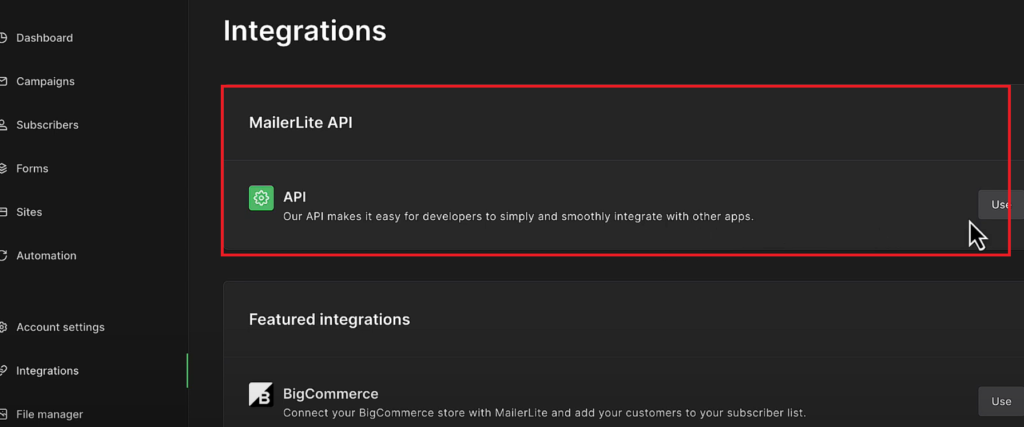
Go to Integrations: Once you’re logged in, look for something called “Integrations” located just below “Account Settings” as shown on the snapshot below. Click on it.

Find the API Key Section: In the Integrations area, you’ll see a section called “MailerLite API.” Click on “Use” button, and you’ll find your API key—a long string of letters and numbers. This is your secret code!
Step 3: Generate and Copy Your API Key
Now that you see “Generate New Token” button, you need to click and generate new API key. You can either enter your website name as the token name or any other name as you wish. Here’s how:


- Download or Copy the Key: You can now either download the API key in text format or copy the key to your clipboard!

Step 4: Add the API Key to Your Website
Next, you’ll need to add this API key to your website so it can connect to MailerLite. I’ll show you how to do this in two different ways—using a plugin for WordPress (if you’re using WordPress) or manually adding it to your website.
Option 1: For WordPress Website
- Install the MailerLite Plugin: Log in to the WordPress Admin Panel. Go to your WordPress dashboard. In the menu, click on “Plugins,” then “Add New.” Search for “MailerLite” and click “Install Now.”
- Add New Plugin: Go to Plugins » Add New Plugin. Make sure you select the official plugin of MailerLite.
- Install and Activate: Click the link labeled Install Now and then click Activate after the plugin is installed.
- Installing the MailerLite Plugin: Open Plugin Settings, Find MailerLite in the side menu of your WordPress; put and select Settings.
- Enter Your API Key: Paste in the field the API key you copied earlier.
- Save Settings: Click on Save API key to actually connect your WordPress site with MailerLite.

Step 5: Test the Connection
Now that you’ve added the API key, let’s make sure it works!
- Create Sign Up Form: On the sidebar, under MailerLite » Signup forms, click Add new.
- Add the Form to Your Website: Embed the form on your website (MailerLite will give you instructions on how to do this).
- Choose Form Type: Use either of those previously created in MailerLite or create a new sign up form. If choosing those previously created in MailerLite, click Create form.
- Setup Your Form: If you are creating a new form, leave the title, description, and success message filled out and add any extra fields that you need. Once you have done the settings click Save form.
- Embed Form into Pages/Posts: To add a form to any particular page or post, go to the page/post from the WordPress editor.
- Add MailerLite Icon: Click the MailerLite icon in the editor toolbar. Select your form and add it.
- Publish Changes: Save or update your the page/post to push the form live.
Additional Tips
- Pop-up Forms: If you want to use pop-up forms, ensure that the pop-up forms script is enabled in the plugin settings. These will automatically display based on your configurations in MailerLite.
- Testing: After integrating and setting up your forms, test them to ensure they are functioning correctly and that subscribers are being added to your MailerLite list.
By following these steps, you can effectively integrate MailerLite with your WordPress site and start collecting email subscribers.
And that’s it! You’ve just learned how to set up the MailerLite API key on your website. Now you can start using all the cool features MailerLite has to offer, like sending automated emails and tracking your subscribers. Great job!
Option 2: Manual Integration
If you’re not using WordPress, you can add the API key manually. Here’s how:
- Access Your Website’s Backend: This might sound tricky, but don’t worry! You can do this by logging in to your website builder or CMS (Content Management System).
- Find the Integration Settings: Look for a section that talks about “Integrations” or “API” settings.
- Paste the API Key: Once you find it, look for a box where you can enter your API key. Right-click in the box and choose “Paste.”
- Save Your Changes: After pasting the API key, make sure to save your changes.
Conclusion/Summary
Setting up the MailerLite API key on your website is easier than it sounds, and it opens up a world of possibilities for your email marketing. By following these simple steps, you can connect your website to MailerLite, allowing you to automate subscriber management, send personalized emails, and keep your data synchronized in real time. Whether you’re using WordPress or manually integrating the API, the process is straightforward and ensures that your marketing efforts are more efficient and effective.
Now that you’ve successfully set up the API key, you’re ready to make the most out of MailerLite’s powerful tools to grow your audience and improve your campaigns!